


How To Create A WooCommerce Custom Registration Form

The first step to crafting offerings that resonate with B2B customers is understanding their needs and preferences. This goal begins from the moment they register on your WooCommerce store. By implementing a WooCommerce custom registration form, you can gather relevant customer insights from the start, helping you tailor a wholesale purchase experience that satisfies B2B clients.
Bookmark this guide, for this will help you do just that! In this article, we’ll explore how you can create and successfully use a WooCommerce custom registration form to know your customers better. Let’s dive right into it!
Why Use A WooCommerce Custom Registration Form?
As a WooCommerce wholesaler, you’re likely familiar with the platform’s default registration form:

While this streamlined registration form facilitates easy and fast onboarding, it might not be suitable for businesses that serve wholesale clients. B2B transactions are typically large in scale, and you may want to set screening criteria before granting wholesale privileges like access to exclusive deals and discounts.
With a WooCommerce custom registration form, you can:
- Learn about your customers: Gather specific information that matters to your business. This may include key details like company size, industry, or preferred communication channels.
- Streamline onboarding: With important details about your clients accessible right from the beginning, you can automate approval processes, account setups, and pricing adjustments for your clients.
- Enhance security: Having a WooCommerce custom registration form also enhances the security of your business. By including additional fields for business information, tax IDs, or other relevant details, you can screen wholesale customers better and verify their legitimacy. As a result, you mitigate risks of fraudulent activity and foster trust in your current customer base.
- Craft better offers and promotions: Likewise, you can use the data you’ve gathered in the registration process to inform your future marketing strategies. Let’s say you find out that most B2B clients prefer being contacted via email. Therefore, you can tailor your communication efforts accordingly by sending targeted email campaigns with updates or product discounts.
What Fields To Add To Your WooCommerce Custom Registration Form
There are several additional fields you can add to your WooCommerce custom registration form, and your choice will depend on your unique business requirements. However, while you may be tempted to ask for lots of information all at once, it’s also important to strike the right balance so as to not overwhelm your B2B customers.
Here are some examples of fields you may want to add to your registration form:
1. Business details
Consider asking for business-specific details such as industry, company size, and years in operation. Knowing these details from the outset can help you assess the suitability of your offerings and tailor relevant product recommendations. It also helps you verify the legitimacy of prospective clients, ensuring you’re engaging with credible leads.
2. Contact details
Smooth communication is paramount in B2B relationships. Some examples of fields you can add include contact person, email address, phone number, and mailing address. Having this information accessible allows you to establish a direct communication channel for order confirmations, inquiries, and support.
3. Marketing preferences
The last thing you want when you’re building your wholesale customer base is to annoy new B2B clients with promotions they did not opt for. You can mitigate this risk by gathering information about your prospects’ preferred communication channels. For example, you can add a field that allows clients to specify their preferred communication method, whether it’s email, phone, or postal mail.
4. Purchasing preferences
You can create a better overall wholesale purchasing experience by learning about your B2B customers’ purchasing preferences. What are their preferred payment terms, expected order volume size, or preferred shipping methods? Gathering this type of information beforehand will help you anticipate their needs and tailor your services to meet their expectations.
5. Additional information
Lastly, you may want to add a special field for requests, comments, or queries in your WooCommerce custom registration form. New B2B leads are often most engaged the moment they register for your business. Therefore, you’ll want to grab this opportunity to answer their questions and eliminate any doubts. Being proactive showcases your dedication to providing the best experience possible, fostering trust in your business partnerships.
How To Create A WooCommerce Custom Registration Form
Using the default WooCommerce registration form may not suffice if you’re catering to the B2B sector. While WooCommerce doesn’t provide the functionality to customize your registration form, you can easily do this using plugins like Wholesale Lead Capture!

With Wholesale Lead Capture, you can create a fully customized B2B registration form, set lead approval processes, and automate onboarding emails to keep wholesale customers engaged.
Keep in mind that we’ll be using this plugin throughout the tutorial. So, make sure you already have it set up and installed. If you haven’t done so already, you can get the plugin here or learn more with our getting started guide.
Let’s get right into it!
Step 1: Edit your registration form
After installing and activating Wholesale Lead Capture, navigate to your WordPress dashboard and go to Wholesale > Settings > Wholesale Lead Capture > Registration Form. Here, you’ll find the interface where you can customize your registration form by enabling desired fields or adding new ones.
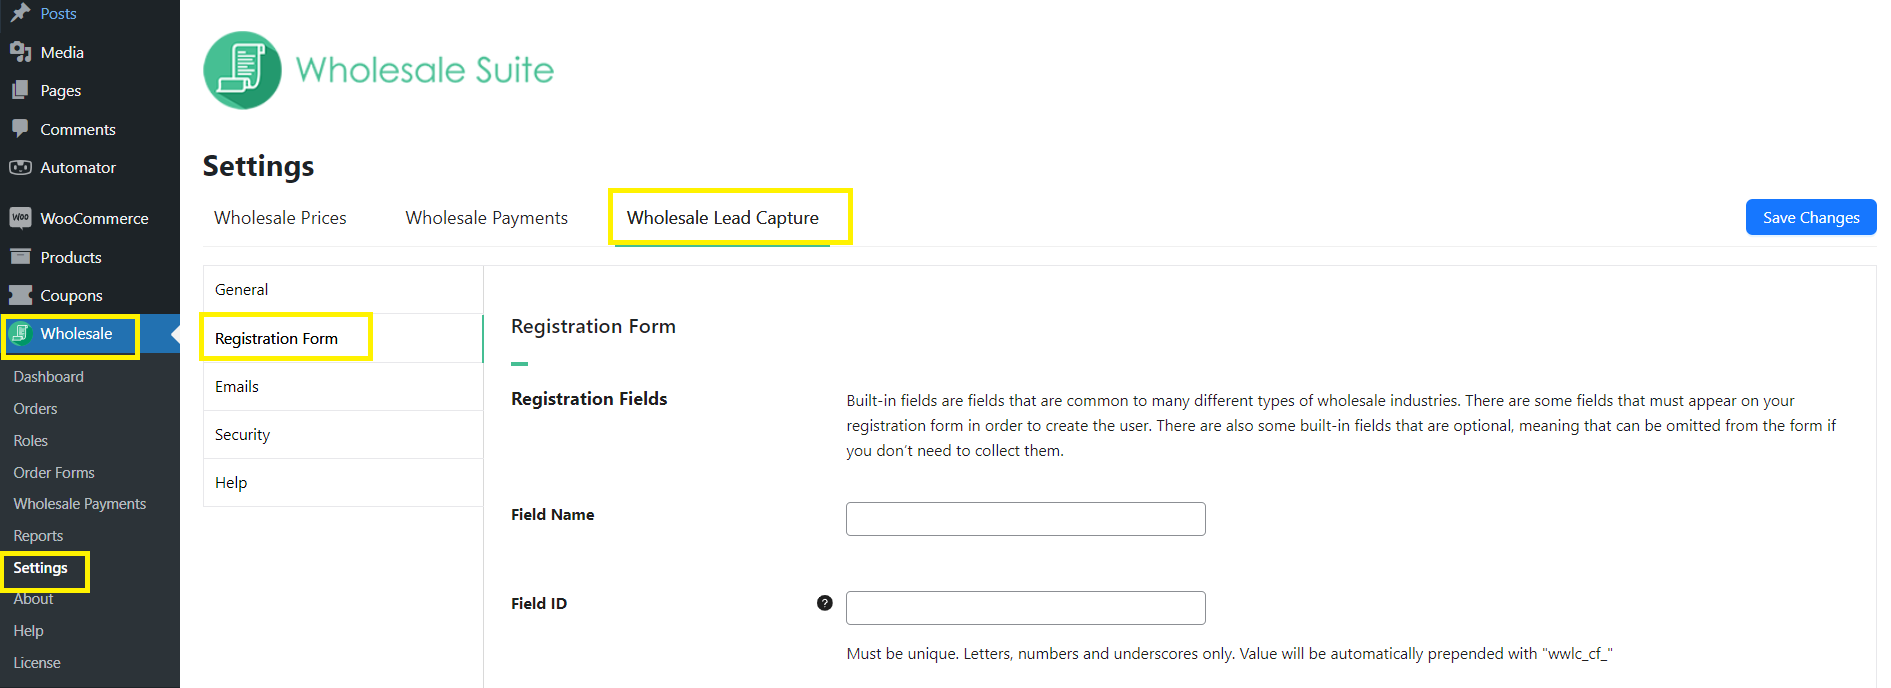
The plugin makes setting up easy for you–it comes with a set of default fields that you can easily enable or disable depending on the requirements of your business. Scroll down to find the table containing the default list of fields:

Important Note: There are a few required fields that cannot be disabled, including First Name, Last Name, and Email.
These default fields, as shown above, feature the most basic information you can ask B2B clients. You can enable or edit each field by clicking the Edit button under the “Action” tab. A new settings page will appear, where you can tick the field “Enabled” and “Required”. You can also change the placeholder for each field:

Take note that the default fields may have extra settings you can tweak to help you create a streamlined registration experience for B2B clients. For example, the default Address field allows you to add a second Address Line to cater to accommodate longer address format:

Step 2: Add your custom fields
Also right within the registration form settings, you can create custom registration fields to ask for additional information from potential wholesale clients. To create your custom field, simply add the value to the following fields:
- Field Name: This is the label of your custom field. (Example: “Industry”, “Business Website”)
- Field ID: Your field’s unique identifier or code.
- Type: You can choose from several input types, including Text, Number, Phone, URL, and even Radio Button Fields or Checkboxes.
- Placeholder: Optionally, you can also add a placeholder text to guide users on what to input into the field.
- Default value: This sets a default value for your custom field, which users can overwrite if needed.
Additionally, you can tick the following options if you want to:
- Show on the checkout page: Display your custom field on the WooCommerce checkout page.
- Required: Make the field mandatory to be filled out by wholesale clients.
- Enabled: Show the custom field on your registration form.
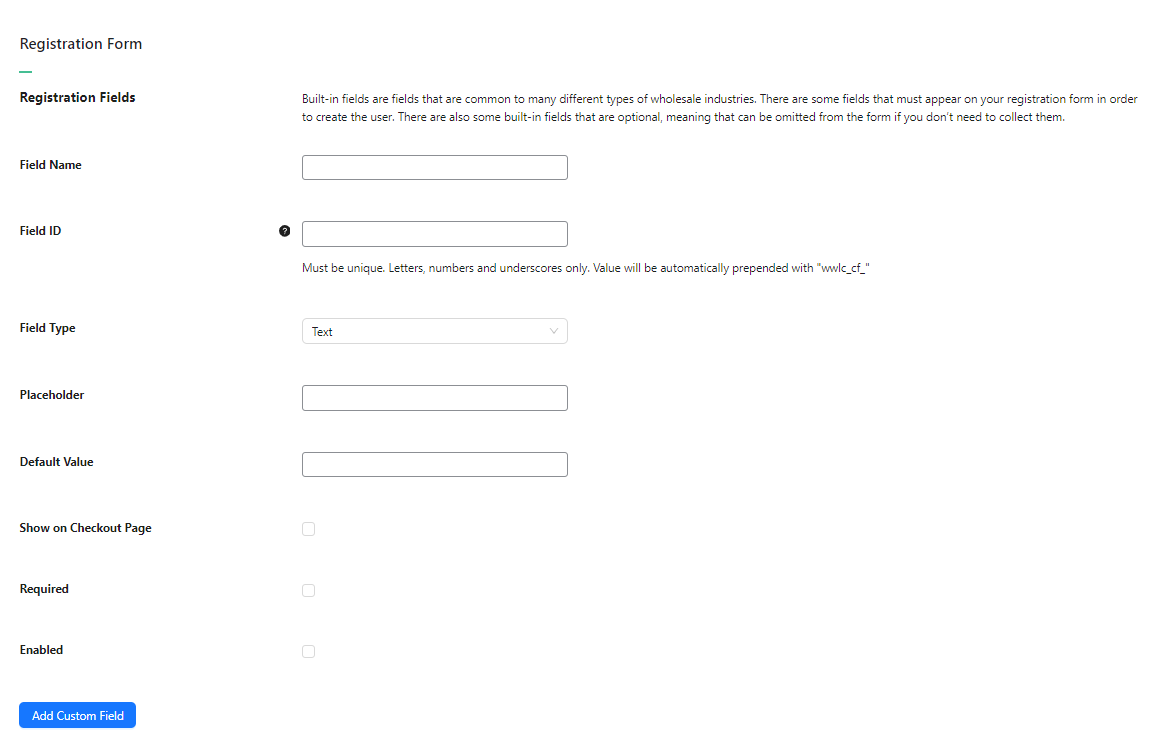
After making your changes, simply click “Add Custom Field” to add the field to your registration form!
Let’s illustrate this with an example. Suppose you’re adding a custom field to ask about a potential lead’s industry, here’s how you can modify it:

Power Tip: You can easily rearrange your WooCommerce custom registration form with a drag-and-drop motion. Simply click and hold on a field, then drag it to your desired position within the form.
Step 3: Set your approval process
Now that you’ve customized your WooCommerce registration form, it’s time to ensure a smooth onboarding process for your new leads!
With Wholesale Lead Capture, you can choose either a manual or automatic lead approval. For insights about how you can decide the best approach for your business, check out our guide:

From your WooCommerce dashboard, navigate to Wholesale > Settings > Wholesale Lead Capture > General. Then, scroll down to Lead Actions. From here, you can either select:
- Manual Approval: When selected, new wholesale leads will require approval from administrators or store managers before being granted access to wholesale privileges.
- Automatic Approval: Conversely, selecting this option automatically approves B2B registration upon submission of their application.

Important Note: By default, new B2B leads are granted the “Wholesale Customer” role.
Step 4: Publish your form!
By this point of the tutorial, you’ve successfully created a WooCommerce custom registration form and set an approval process to manage your B2B leads. You’re ready to make it live!
Wholesale Lead Capture makes this easy for you, as it automatically creates the following pages:
- Log-in page: https://[yoursiteurl]/wholesale-log-in-page/
- Registration page: https://[yoursiteurl]/wholesale-registration-page/
- Thank you page: https://[yoursiteurl]/wholesale-registration-thankyou-page/
By default, the registration page displays your created WooCommerce custom registration form. However, you can also place it anywhere on your website using its default shortcode: [wwlc_registration_form].
To add the registration form on a different page, simply navigate to that page, add a shortcode block, and enter this default shortcode form. Hit “Publish” (or “Update”, if modifying an existing page) and you’re good to go.

Yes, that’s how easy it is! Here’s an example of how a wholesale registration form would look like for your B2B customers:

Conclusion
Knowing your customers is key to creating a purchase experience that keeps them coming back. With a WooCommerce custom registration form, you can gather important information about potential B2B customers from the start. This will help you craft offerings that resonate, enhancing customer satisfaction and building lasting relationships.
In this guide, we walked you through how you can easily create a WooCommerce custom registration form using Wholesale Lead Capture. To summarize, let’s check out the steps below:
Using Wholesale Lead Capture, you can easily set up a simple B2B registration and onboarding process on your WooCommerce store.
Do you have any questions about setting up a WooCommerce custom registration form? Let us know in the comments below!
The post How To Create A WooCommerce Custom Registration Form appeared first on Wholesale Suite.


