


How To Create Custom Wholesale WooCommerce Payment Plans
One powerful way to differentiate your e-commerce business and serve B2B customers better is by offering custom WooCommerce payment plans. Payment flexibility and convenience are key drivers of customer satisfaction in the B2B realm, as wholesale customers often engage in large transactions and recurring purchases. By giving your customers payment options tailored to their needs, you empower them to buy more and choose you as their preferred supplier.
In this guide, we’ll discuss the importance of payment flexibility and walk you through how to create custom WooCommerce payment plans for your valued B2B buyers. Without further ado, let’s get straight into it!
Key Advantages Of Offering Custom Payment Plans For B2B Buyers
Modern B2B buyers expect a purchase experience at par with the B2C shopping journey. They want the same level of customization tailored to their unique needs–and this goes for their payment options too!
Here’s why offering custom WooCommerce payment plans can be a game-changer for your wholesale business:
1. Empower & satisfy your B2B customers
Custom payment plans empower your B2B customers to choose payment schedules in alignment with their current financial circumstances. By offering tailored installment options or deferred payment schedules, you ease the burden of large upfront payments and give them more flexibility to buy. As a result, they feel more confident in their purchasing decisions and are more likely to return for a repeat purchase!
Offering custom WooCommerce payment plans also demonstrates your commitment to addressing the unique needs of your wholesale clients. This allows you to cultivate a stronger sense of partnership built on trust and mutual benefit, fostering customer loyalty in the long run.
2. Increase sales opportunities & improve cash flow
The large upfront costs associated with B2B transactions can be a significant financial barrier for wholesale clients looking to make big purchases. Smaller enterprises or startups often have limited capital resources and prefer to spread out their expenses over time. Offering custom payment plans allows you to capture these market segments and empower them to make large orders. This directly translates into increased sales opportunities for your business.
Furthermore, allowing wholesale customers to spread their payments over time enables you to create a more predictable cash flow for your business. As a result, you can better manage, plan, and allocate your resources to grow your venture.
3. Create a competitive advantage
Differentiation is key to standing out in today’s competitive e-commerce landscape. Offering custom WooCommerce payment plans quickly sets your store apart from competitors who are only offering standard payment options. This unique selling proposition attracts discerning B2B clients seeking flexibility in their payment options.
How To Create Custom Wholesale WooCommerce Payment Plans (Step by Step)
While WooCommerce doesn’t have built-in functionality that allows you to create custom payment plans, you can easily implement this for your store using our new plugin: Wholesale Payments.
Wholesale Payments, our newest addition to Wholesale Suite, allows wholesalers like you to offer flexible payment terms, create custom WooCommerce payment plans, and streamline invoice management right within your WooCommerce store!
So, before we dive into the tutorial, make sure that you’ve:
- Set up your WooCommerce store
- Have installed and activated Wholesale Payments (Get it here!)
Now that we have that out of the way, let’s get started!
Step 1: Set up Wholesale Payments
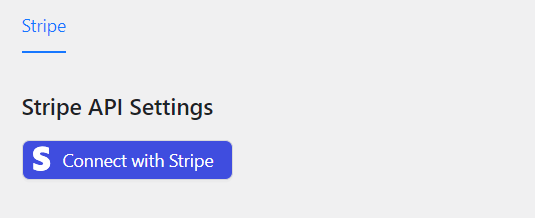
After installing Wholesale Payments, the first step to take is to configure the plugin by connecting your Stripe account.
Connecting your Stripe account to wholesale payments will enable you to seamlessly send out invoices to your customers. It will also allow your valued B2B buyers to choose their desired payment methods when paying for their invoices.
To do this, simply head over to Wholesale > Wholesale Payments. Then, click “Connect with Stripe”.
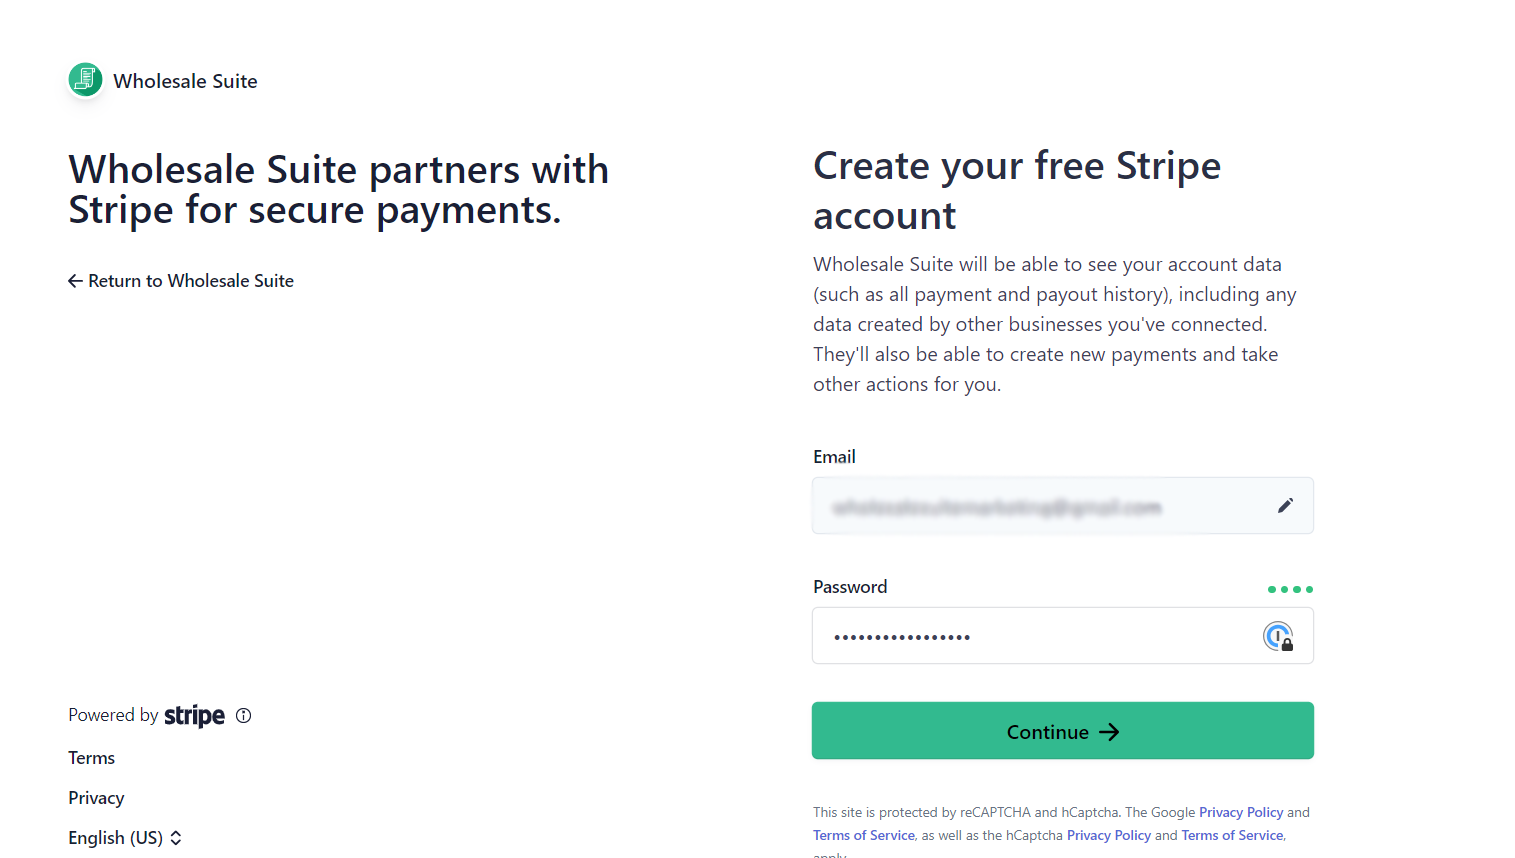
After clicking this button, you’ll be redirected to the Wholesale Payments Stripe integration page. Then, you can either:
- Connect Existing Stripe Account: If you already have a Stripe account, simply login to your account to link it with Wholesale Payments
- Create a New Stripe Account: If you don’t have a Stripe account yet, no worries! You can conveniently create one directly from the integration page. Simply follow the prompts to set up your Stripe account, ensuring accurate entry of your business and banking information.
After completing this step, you’ll be redirected to your WordPress dashboard. You can check if Wholesale Payments is successfully linked with your Stripe account by heading to Wholesale > Wholesale Payments > Stripe. If successfully integrated, you’ll see a summary of your Stripe API settings, confirming that Wholesale Payments is seamlessly connected to your payment gateway.
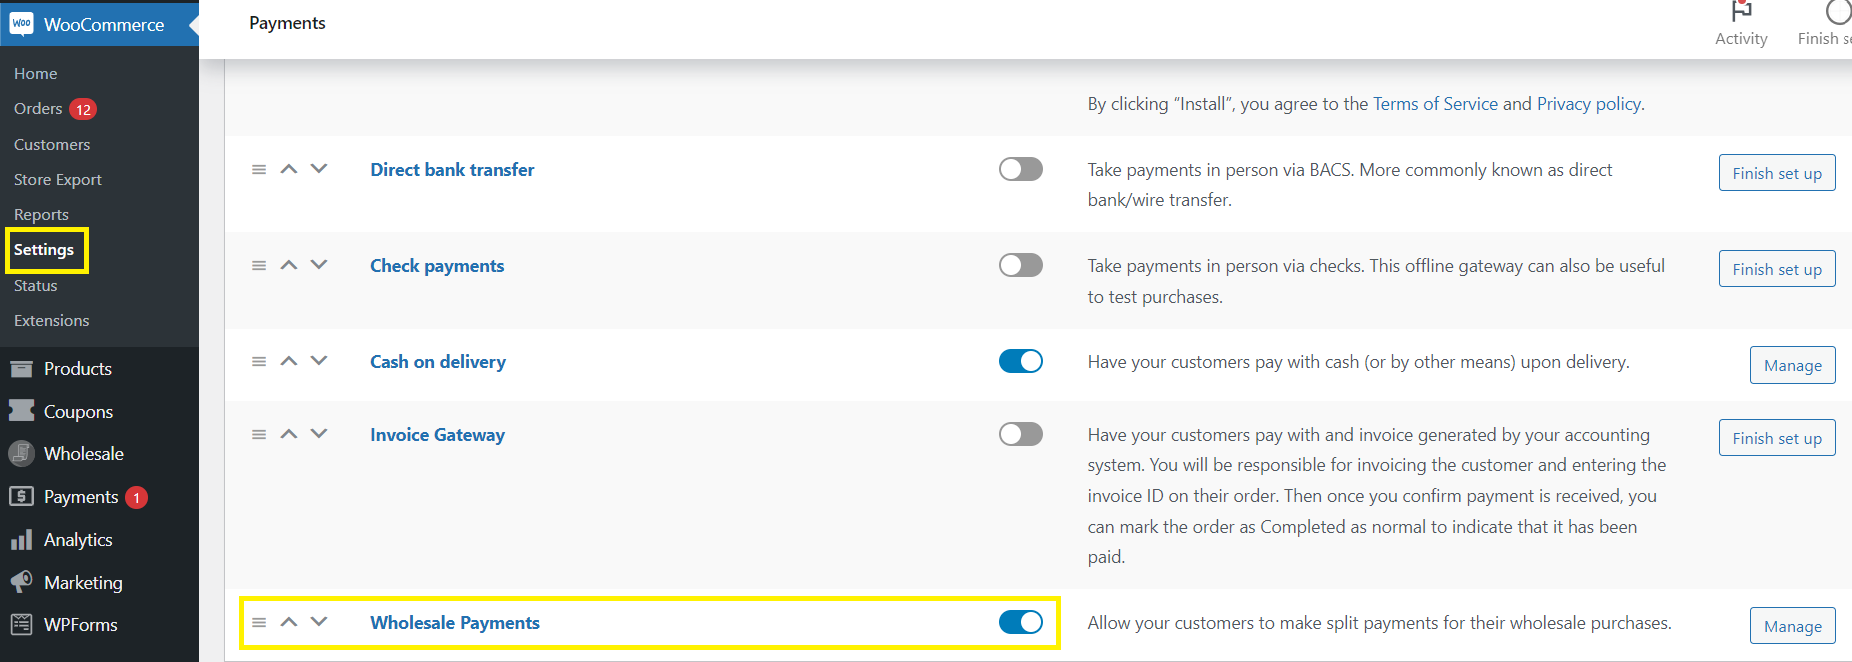
Enable Wholesale Payments in WooCommerce Payment Methods
The next thing you want to ensure is that you add Wholesale Payments to your WooCommerce payment methods. To do this, navigate to WooCommerce > Settings > Payments. Scroll down to locale Wholesale Payments. Then, simply toggle the switch to enable it for your store and make it accessible to your B2B buyers.
Step 2: Create your custom payment plan
Now that you’ve successfully configured Wholesale Payments, you can now easily create custom WooCommerce payment plans! Firstly, from your WordPress dashboard, navigate to Wholesale > Wholesale Payments.
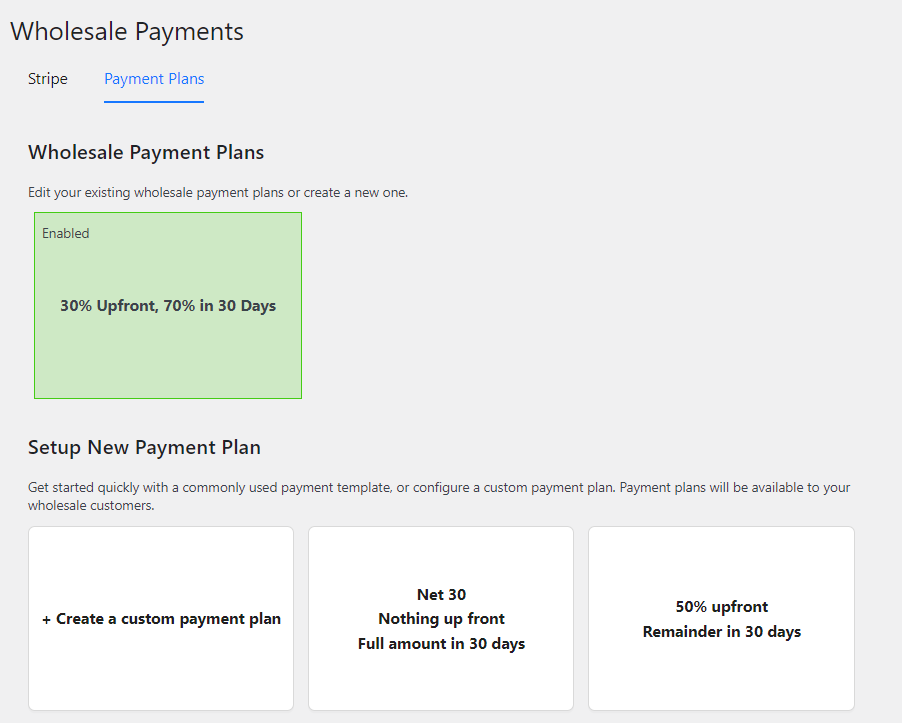
Under the “Payments Plan” tab, you’ll immediately see a list of pre-configured payment plans available for you to use. Wholesale Payments make it easy for you to get started by making these common payment plans available, including NET 30/60/90, 3 equal payments, upfront payments, and more. You can also enable and edit these payments to suit your business needs.
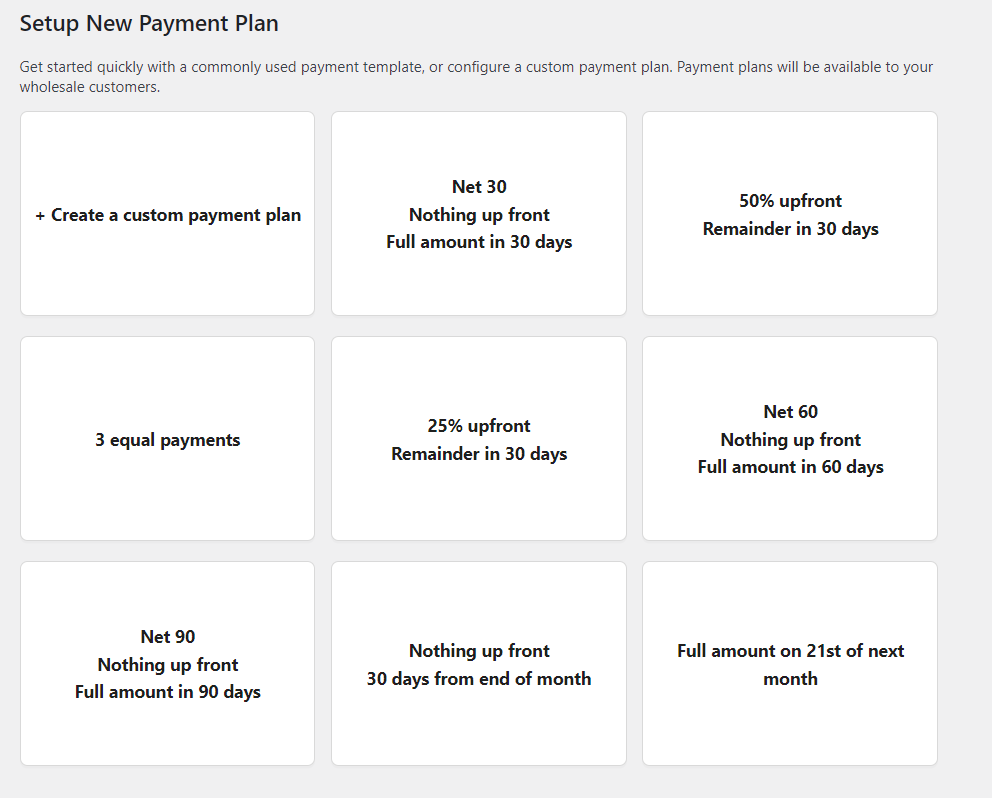
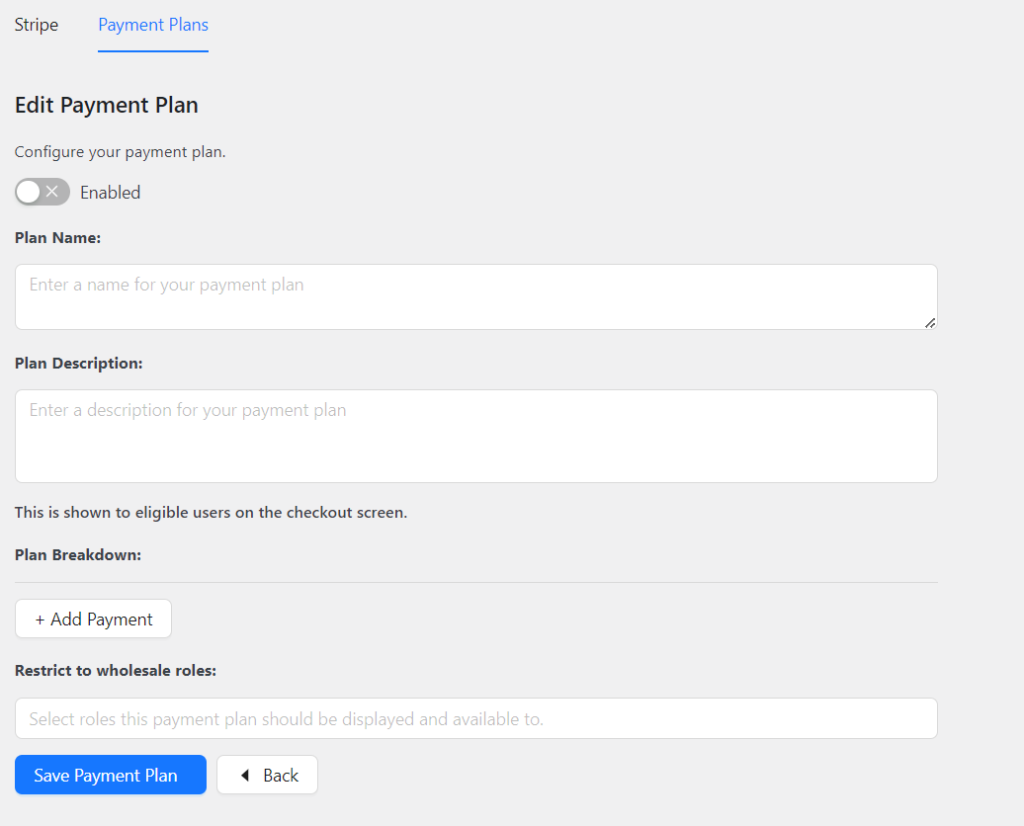
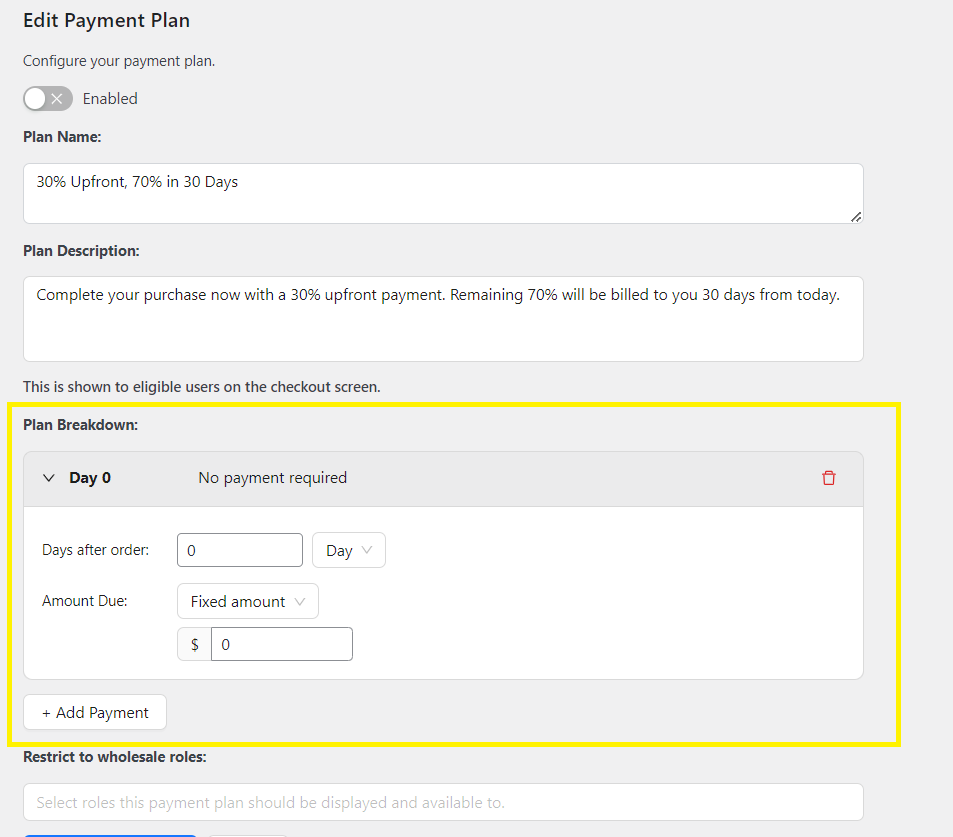
However, let’s focus on creating custom WooCommerce payment plans for now. To create a custom payment plan, click on “Create a Custom Payment Plan.” This will reveal the “Edit Payment Plan” tab, where you can configure your payment plan any way you like.
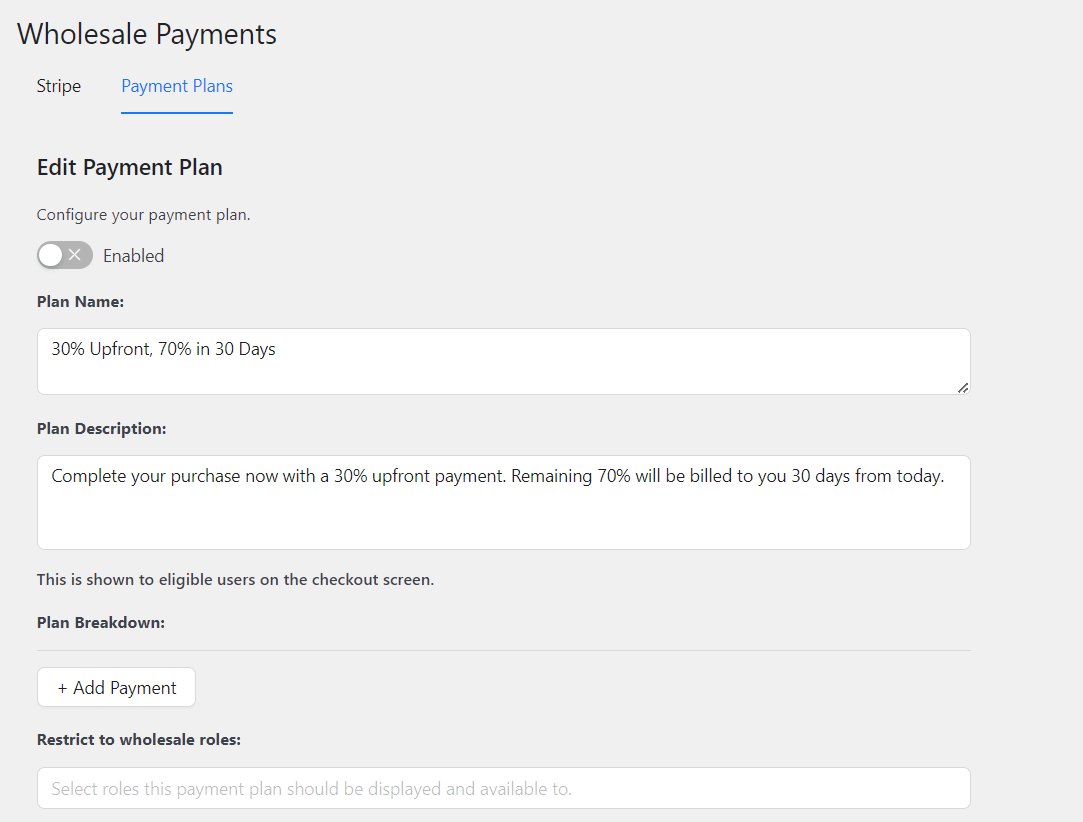
In this example, let’s create a custom payment plan that allows wholesale clients to purchase by paying 30% upfront of their invoice, with the remaining 70% due in 30 days.
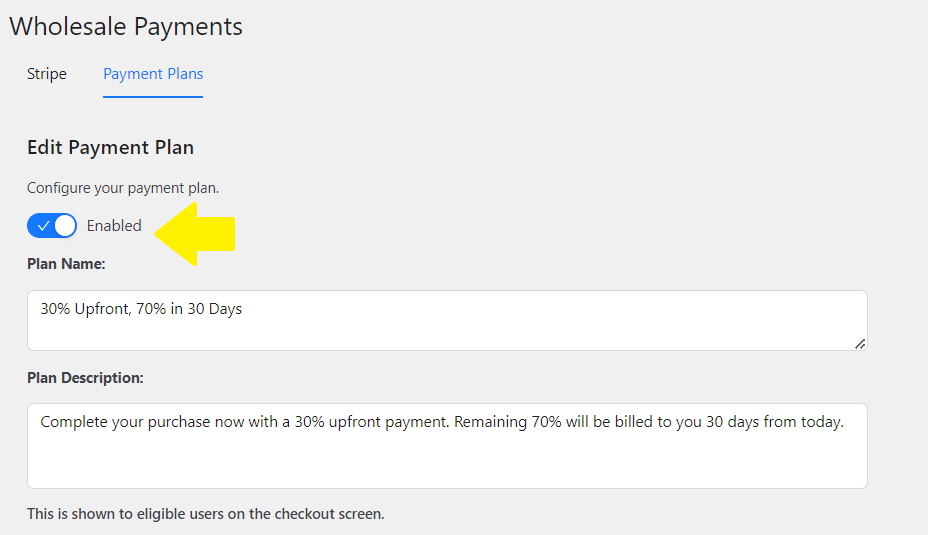
Firstly, give your payment plan a name. Let’s use “30% Upfront, 70% in 30 Days” to clearly outline the terms of the plan. Then, enter your Plan Details.
Tip: The Plan Name will show up for your wholesale users in the front end, so make sure to keep it concise and easy to understand.
Step 3: Configure your custom payment plan
Now, it’s time to configure your plan! Under “Plan Breakdown”, click on “Add Payment” to set up a payment schedule for your wholesale clients. This is where the flexibility and convenience of Wholesale Payments truly shines. Using our plugin, you can modify:
- Days After Order: Set the timing of each payment relative to the order date. (Note: Day 0 is the day of the order.)
- Amount Due: Choose between fixed amounts, percentages of the total order, or designate no payment required for specific intervals.
You can also add as many dates as you want to create more detailed WooCommerce payment plans!
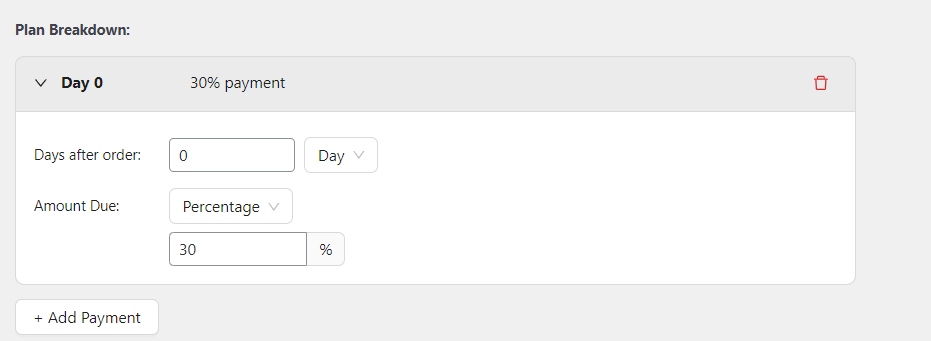
Now, let’s fill out these details for the sample custom payment plan we’re making: 30% Upfront, 70% in 30 Days.
Since we require a 30% upfront payment, fill out “Days after order” with the value “0”. This is also the configuration set by default when you’re first creating your payment plan. Then, set the “Amount Due” to “Percentage” and input 30%.
To create the next payment, click on “Add Payment.” Set “Days after order” to “30” and the percentage to “70%.”
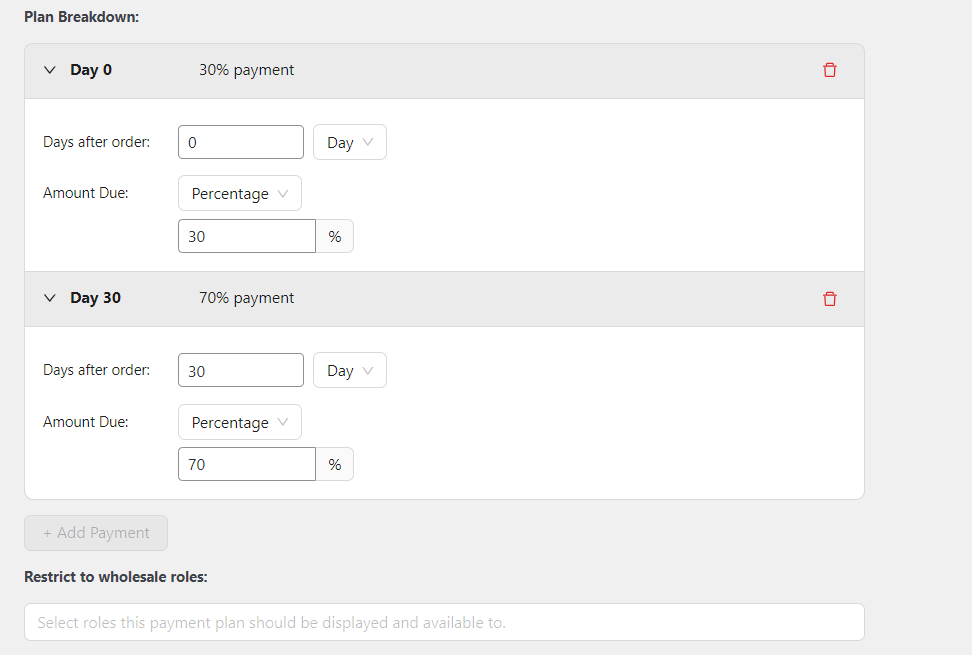
After completing the payment schedule setup, you’ll notice that the “Add Payment” button will automatically be disabled once the total amount reaches 100%. This helpful feature ensures that you don’t accidentally add additional payments beyond the total invoice amount.
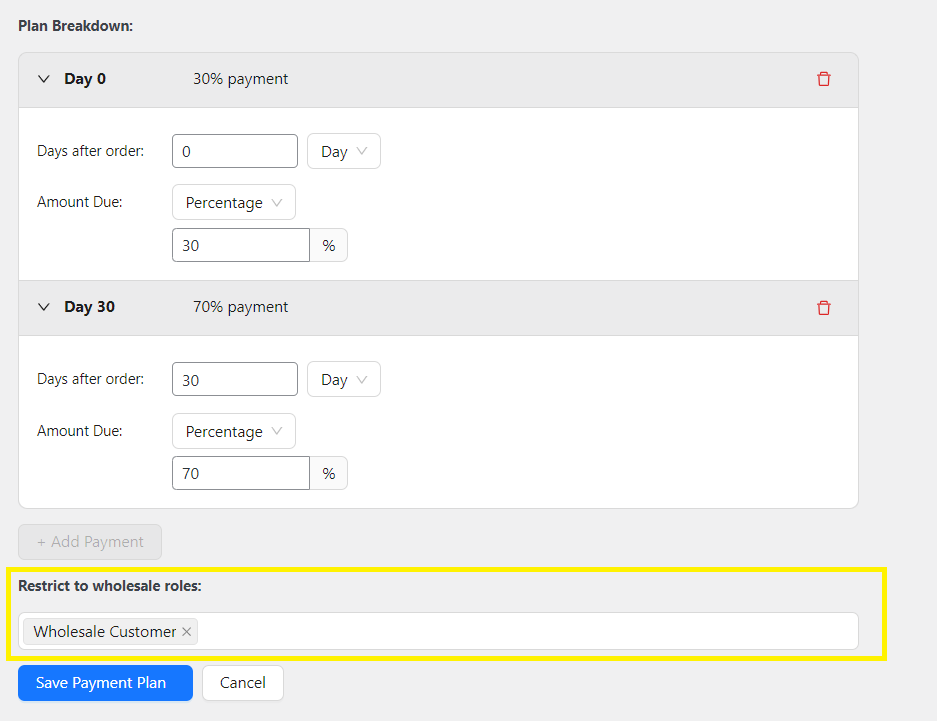
Making WooCommerce payment plans exclusive to wholesale user roles
Lastly, you have the option to restrict your custom payment plans to specific wholesale customer roles. This ensures only eligible wholesale customers can access your payment plans. For this example, let’s restrict our payment plan to the default Wholesale Customer user role.
Note: Wholesale Prices Premium, another plugin under Wholesale Suite, allows you to create unlimited wholesale user roles for your WooCommerce store. If want to learn more about how to create and manage wholesale user roles, check out this guide!
Step 4: Save your changes and enable your custom payment plan
Congratulations on successfully creating your first custom payment plan! Now, all we need to do is to make it available to your wholesale customers.
Under “Edit Payment Plan,” locate the “Enabled” toggle button. Simply click on it to enable your custom payment plan. Don’t forget to click “Save Payment Plan” to save all your changes so far!
Once you go back to the payment plans dashboard, you’ll notice that enabled payment plans are highlighted in green:
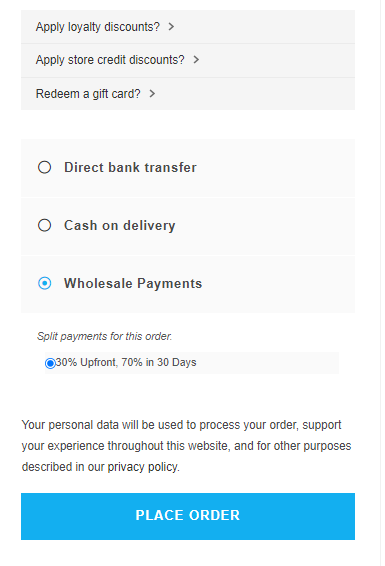
So, that’s it! Now, your wholesale customers can seamlessly select this payment plan upon checkout. Check out how it will appear in the front end:
Conclusion
Meeting the needs and expectations of your valued B2B buyers is crucial to stay ahead in today’s e-commerce landscape. This includes giving them flexible payment options and tailoring payment plans to their needs. Fortunately, this endeavor is easy to achieve with powerful plugins like Wholesale Payments!
In this article, we’ve discovered how to leverage Wholesale Payments to create custom WooCommerce payment plans and offer flexible payment solutions. To summarize, here are the key steps we’ve covered:
- Set up Wholesale Payments
- Create your custom payment plan
- Configure your payment plan
- Save your changes!
Wholesale Payments is our newest addition to Wholesale Suite, a collection of powerful plugins for WooCommerce wholesalers. Our tools allow you to seamlessly manage wholesale pricing, create one-paged bulk order forms, and capture B2B leads effortlessly with registration forms. With our suite of plugins, you can elevate the B2B customer experience in WooCommerce and scale your business to new heights!
Do you have any questions about creating custom WooCommerce payment plans or enhancing your wholesale operations? Feel free to reach out to us in the comments section below.
The post How To Create Custom Wholesale WooCommerce Payment Plans appeared first on Wholesale Suite.